Tuesday 8 December 2015

BTEC Extended Diploma in Video Games Assignment 2: Creating a game: Shapeman Unit 1/Unit 72/Unit 22 Computer game design

BTEC Extended Diploma in Video Games
Assignment 2: Creating a game: Shapeman
Unit 1/Unit 72/Unit 22 Computer Games Design

Development of Shapeman

Task 1.) This is my sketch on what I wanted and ruffly expected my game to look like. 


I wanted the shapes to be in the corner and the enemies placed in random positions. The sprite number is in the center and the score is above the sprite number. The player starts on the middle left side, while the collectibles are in corners which you can collect by choice to increase your score. theirs four moving walls which have been toned in and shown the direction they go in. The game also has four blades that destroy the player on impact.

1.2) These are how the sprites were made.
These are my Sprites

Spr_Circle

This is my Circle sprite which was created using the circle tool and a range of different tones of red.
The tones got lighter as the tones reached the higher right corner of the shape.
Tools used: Paint bucket, brush, paste, duplicate and the circle shape tool.

The Animation:

The tones became darker and when it reaches the image (5) it is completely one colour. I then rewind the effect and it gives a nice light to dark effect on the circle.


This sprite was 32 by 32 and only has 9 images for the animation, Which gave a nice slow effect to the shape, when in play.


Spr_Cross


This is my Cross sprite which was created using the line tool and a range of dark and light purples

The colours were simple purple tones.
The Tools used: Paint, line tool

The Animation:

The tones switched during the animation and was a much faster when showing the effect in the game.


This sprite was 32 by 32 and only has 10 images for the animation. (Every two sprites another change is made).


Spr_Triangle

This is my Triangle sprite which was created using the line tool and a range of dark to light tones.
The tools used: Paint tool, brush, line tool.

The Animation

I  placed a light green on the outer layer and then continued using lighter green going inwards while still keeping the shape of the triangle.
Image 5 is when the triangle begins again.


Spr_Square

This is my Square sprite which was created using the square tool and a range of different blue colours
The Tools used: Paint tool, brush, line tool, square tool.

The Animation:

The colours were dark to light going inwards. Image 3 is when the sprite rewinds.

This sprite only has five images which are slow in animation which works well.


Spr_Pentagon

 This is my Pentagon sprite which was created using the brush tool and a range of yellow tones.
The tools used: Paint tool, brush

The Animation

The effect is very similar to the square animation with the effect of dark to light, yet it is light to dark.

This sprite has five sprites and has a similar speed with the square sprite.


1.3) These are my objects and how they function.

Obj_Circle
Obj_Cross
Obj_Triangle
Obj_Square
Obj_Pentagon

These objects are the shapes in the corner in the room, which is where you can change your characters shape.


These objects don't have any movement or functions except the collision with the main character. 
(This could also be located in the Obj_player)
On collision, change the players sprite to the sprite it has just collided with.

Controller:

(Found in the controller, in create and then in variables)


This is a list of all the important commands that the game needs to be set to.


An example is the (lives = 3) which makes the game give you three lives.

The list after the globalvar are what the list contains underneath.

The only error I had, which i fixed was forgetting to add "Myshape"


I also increased the game ticks to make the sprites change at a slower rate which was a gave a better result.
(Found in the controller, in step and then in "Execute a piece of code."


(Piece of Code)

This is where the "gameticks" and "countdown" are being introduced and values are being placed.

This is also the same code which tells the player that they have "Ran out of bad guys" this is shown when all the enemy's are killed.

This also gives commands to changing the sprite to the next sprite, which is set to random
(irandom 4)
This chooses a random object that one of your shapes will be.
Circle
Cross
Triangle
Square
Pentagon
(Found in the controller, Event-step and then "Execute a piece of code."

This also includes the "Set the colour" and "draw the value of score" Which is about the score of the game. This is connected to the collectible which has a command of "Destroy on instance"


This is the code which links with the "spritenum"

This commands the sprite to change depending on the number of the sprite.

This is the number which is displayed in the center of the room that makes people aware for the next sprite change.


The bottom part of this code, allowed me to choose where i wanted the gameticks, countdown etc. to be displayed using the coordinates of the room.

I had most of my problems within this part of the code, because of some sprite names and coordinates. I fixed the problem with the sprites by the (Capitals) Which my sprites were named. The coordinates only had to be changed a little, to get to the wanted place in the room.

Obj_Blade is a simple command to destroy Ome (Player) when collide with each other.

Characters that move (Enemy,ome, wallmove) will need the collision set to bounce because these objects move.
(All objects are set to solid except controller.)

Wallmove


This object has the same design as the wall yet has the function to move (Left to right) this also has an animation to show the player that the walls are different to the walls that don't.

This animation is slow and looks like a type of alarm, which is a cool effect.


This had to have more duplicated images to make the effect of the animation slower. This gave a better effect and was much better on the eye.

This has 45 images that have a repeated animation.

By having the "wallmove" animated it makes the game interesting

The Object "ome" will not be killed by the moving wall but will be blocked instead when collided.

Ome (Player)


This main character will have the most commands,yet simple ones. The main character has the Key commands to make the character able to move.


This code tells the player (after death-3 lives) that "YOU ARE DEAD" and then commands the game to end.

The lower half of the code creates an explosion which is red and will happen when you collide with another shape.


Enemy (Found in "ome" and then "Execute a piece of code."


This this the code that commands the sprites to change depending on the sprite number in the middle of the level.

This code is telling the game that if the number changes to "1" the sprite will turn to the sprite that is "1"

This also tells the game that if you are the same sprite then you will collide and if not then "Idied" will be true.


This is located in the enemy in the "draw-event" then "Execute a piece of code."


This is the code that makes the objects belong with a number which is the game sprite number.


This makes the sprite change to the sprite that is the same number


An example "2" would be a "Triangle"
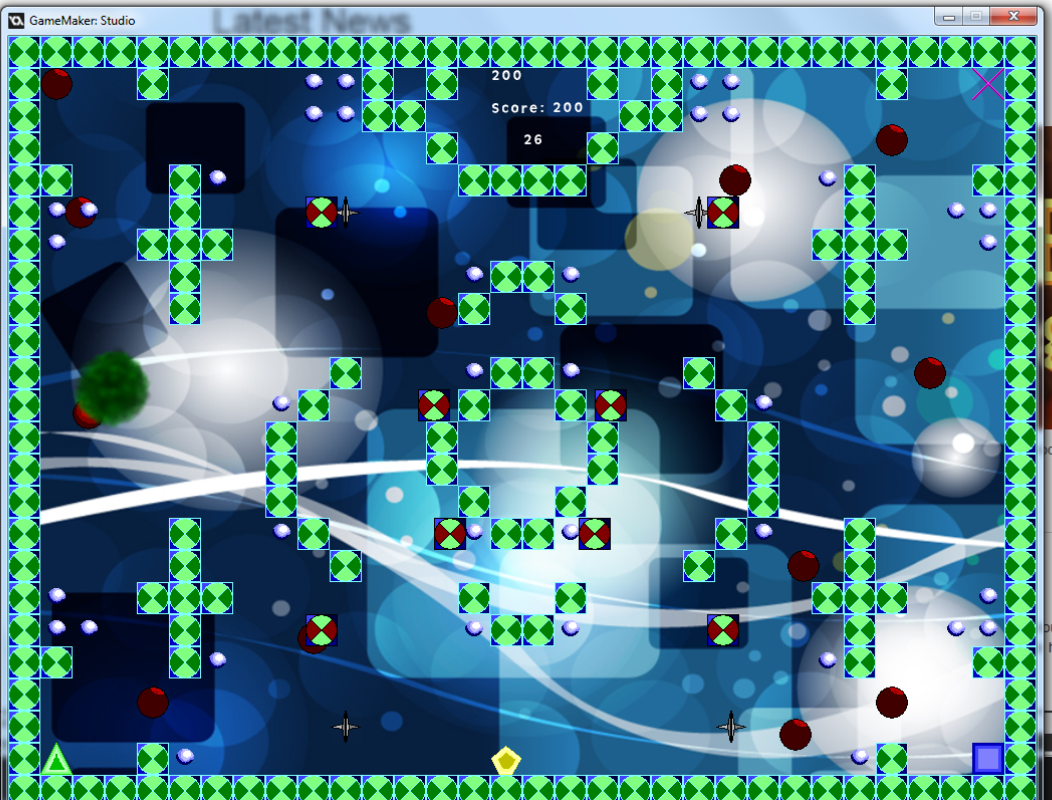


1.4) Room


This is the view of what the game looks like in gameplay.

The background was edited on Photoshop and is suitable because of the shapes.

The score and gameticks are at the top of the level while the enemy's are going in random directions.

While the original shapes that don't move are in the corners.


This is a screen shot of when the player and the enemy collide when there not the same shape

The problem I had with this was placing in my sprite number in the room, which i wasn't able to fix, however by this problem i changed the game ticks to be longer so it would be possible for the player to reach to the other side and change the sprite.

The main character starts at the left side of the level.


The explosion I decided to change colour, making it more suitable with my colour scheme. So i decided to make it green which gave a cool effect.

The collectibles are in certain places to get the player moving around the level.


2.) (Gameplay,errors,effects etc.)

2.2 Glitches/errors

(My errors and glitches are spoken about in the places i had problems with.)
Collision was one of my main problems, which i had. With only in game errors i had to go through the most of the code to find the error. By changing the effect of the explosion, the collision worked.
one of my main glitches was the moving walls which i had to change the direction because it was very easy for the enemy to get stuck or the player blocked.

3.)Feedback (Videos and comments)
Video of me playing:
(Me)
Sprites:"The sprites i think are well made and have cool animations."
Gameplay:"The game play is alright, yet has some problems with the collision"
Errors"The Collision with the same shape resulted the player to be sent back to the same starting position. Also when colliding with the Obj_Blade there was no error message (Which can easily be fixed)
Overall:" The game has cool effects and some alright gameplay.

Video of feedback player:


Person (James)
Sprites:"The sprites are very detailed and have good animations"
Gameplay:"The gameplay is slow but fun"
Errors"I couldn't kill shapes without killing myself and I was sent back every time i collided with the same shape."
Overall:" Very good and fun overall"

4.)Improvements

Next time i would improve the code of the game which could give the sprite number, and some other important information.
I could of also done some more sprites which could of been power ups (Speed).
I would also maybe have a different room layout which could increase the difficulty.
I would of liked to add a soundtrack to make the game more exciting and playable.
And maybe of increased the speed of the enemies.

5.)A user manual. (How to play).

This is the players manual which tells the player how the game works and what you need to do to win.

This also includes the controls and other information that the player might need to know to play the game.

Tuesday 10 November 2015

Unit 78 Assignment 2, Digital Graphics for Computer Games.


Unit 78 Assignment 2, Digital Graphics for Computer Games

Clients Brief: To create a 2D Platform game with a main character and several mobs, with five levels.

Own Brief: To add any other relevant objects or sprites that the client Brief hasn't asked for.
(Your own choice)
My Art Style will be Cel Shaded and pixel art.
It will be aimed at teens and fans of sport.
Not aimed at a certain gender.
Plot:
A basket ball is trying to score a point for the team and to do that he has to reach the hoop, with nails and other mobs blocking its path it will be tough to bounce its way to a win.

Mood Board Ideas:
Main Characters... Pixels (32/32)

Bright colours to give out the hero vibe. Cool weapons and Armour.
Mobs... (Max-32/32)
(Cannot take created media) Copyright is when the owner has the legal right to keep it for themselves. If someone takes a copyright piece without permission the person would be fined a high cost as it doesn't belong to them.

Image result for villains in video gamesImage result for mobs in video gamesImage result for villains in video games

Darker tones, intense look, dark features etc.
Photo realistic, pixelated, Cel shaded.


Concept art
(Concept art can be the Backgrounds,Sprites,Characters,Weapons,Vehicles,Environments)

Concept art is an idea that can be developed into a final design for something.

My art style of my game will be pixel and some cel shaded elements.

Main Character:
This is the character the gamer will be playing.

This is my main characters development in design. With a reflection to the tones. When in animation the ball will be rotating to make it seem like its rolling.

Thumb nail Sketches of the main character:
(Thumbnail sketches are sketches that are quick ideas on what the character or object will look like, an example of this is the same image repeatedly drawn and edited in steps)

Mob 1:
This mob is what the character wants to avoid.


This is my mob 1 development.

This is the Design of Mob 1 (Nail) this Mob won't move which would be found on certain blocks.

Libel is a published false statement that is damaging to a persons reputation, for example: making the person seem wrong in some way (copyright issues)
People may say they took their ideas and so they should be fined.
Showing development or the dates when created will prove its your own work.

Mob 2:
This is a second mob that acts different from the first or has a totally different look.


I copied the first design (Mob 1) then changed the lower section to make it look like legs, because this mob will be moving.(left and right)

This mob would be much tougher in this game because of the movement.

 (all Sprites are within 32 by 32)


Background:
Most backgrounds on 2D platform games have simple and complex backgrounds. With simple designs or colours the background is not that special on usual 2D platform games.


This is an image of a basketball court.

This is in birds eye view and works well with the theme of the game.


The background then changes a little depending on what level you are. Each level you complete the more sections of the game turns green (Five Levels)

(Which shows your progress)


Collectibles:
Collectibles usually are used to increase the score or the health bar of the character.


This is a trophy, which is a collectible. These are located in random places on the levels. (This increases the game score)

This will also have some animation done with it, which gives a nice shine so players can notice them easier.

This goes to the leader boards which you can check and beat your friends.


I then removed the top part of the trophy and placed the basket ball and made a better effect.

With the same animation as the main character idea, the trophy wouldn't need to be edited .


Finish:
This is the end of the level or game.


This is the design of a hoop which is the target to win the level or game. This is found usually found on the opposite side as your spawn.

(All images will be changed to a resolution of 32 by 32)

It was designed in Photoshop.


The design I first created was small in pixels, which i then enlarged and it was pixelated. I then went over the design with the same technique which gave this effect.

 The colours used around the hoop were suitable and were strong which makes it standout when its 32 by 32.


Other ideas: (Characters, Background. etc.)

Main character (idea 2)

 I decided to design a balloon with the same type of game rules.

With this as the main character it keeps the same target audience and improves the logic that it can pop on a nail.

The balloon will have a animation as if its windy.

This character will be able to jump twice and have wall jump enabled, to give the effect of a balloon.


I used (PhotoShop) to design this balloon. I used the paint bucket tool and used a dark blue on the bottom left curve. I then continued to do the same action with lighter tones which gave me the effect of the balloon.

The outline was a simple quick sketch which was later on edited to make the correct size.


Background: (idea 2)

The background would be changed relating back to the balloon. So I designed a very simple cel shaded sky.

The backgrounds that I have created are better to be simple so it doesn't distract the player.


With the help of pixels the toning is much easier to do with colour.

With different shades of blue, i used the fill tool which i then used a dark blue, then i zoomed in and picked the next blue to make this effect. (Alt + mouse)

then i copied and pasted the same shapes and then moved them around to make this effect.


Tuesday 27 October 2015

P2 Art ideas and Computer game Graphics

Unit 78: Digital graphics for Computer Games
P2 Be able to Generate Art Ideas for Computer Game Graphics

Stimulus

Whats is a brief?
Client brief: A client brief is when the client asks certain requirements from your game. For example; "a platform game with five levels."

Own brief: An own brief is when you are left to your own ideas and choices which the client brief has left to you. For example; "designing as many characters or mobs in the game."

Market research; Market research is  a way to make better business decisions, because it covers all the research of marketing (Point of sale) information, consumer insights, industry expertise.

Ideas Generation

What would you do next?
Brainstorming: Brainstorming is one of the ways to store information that you have gathered or thought of from any type of source for example, a novel, a game and a film etc.

Mood Boards: Mood |Boards are full of images or information on a certain subject that its to do with. 

Thumbnail Sketches: Thumbnail sketches are sketches that are quick ideas on what the character or object will look like, an example of this is the same image repeatedly drawn and edited in steps.

Concept art: Concept art can be the Backgrounds,Sprites,Characters,Weapons,Vehicles,Environments
Concept art is an idea that can be developed into a final design for something.

Legal & Ethical Considerations

What is Copyright law? Copyright is when the owner has the legal right to keep it for themselves. If someone takes a copyright piece without permission the person would be fined a high cost as it doesn't belong to them.

What is Libel? Libel is a published false statement that is damaging to a persons reputation, for example; "he was found to be libeled by the newspaper."  

How are females represented in games? Females are changed though out the years of development in games, However they all end up seeming to be in a exaggerated art style which can cause some to judge and believe its wrong.

What is intellectual property? Intellectual Property is protected in law by, for example, patents, copyright and trademarks, which enable people to earn recognition or financial benefit from they invert or creation.

Thursday 15 October 2015

Concept Art

Concept Art

These are the images that i have created for example of concept art.
Concept art is a design and an idea for a later design. These images are ideas and not the final designs. Each image either has exaggerated features that might change depending on the type of genre. and it could also be a design that might have a totally different look, to what it looks like now.
This is a design that i have created on Photoshop. this is an image of the character "Cooler" yet edited to make it my own unique style. In this image I have shown to of the same character, the first is to show what the outline looked like, so that i could edit the features if i wanted to. The second example is the design that has been half completed. This is important to see if the design of the character is working and should be continued to edit.
 This is the image that i drew using pencil, black fine-liner and a normal blue pen. This is the original image that i created for the character "Cooler"

 I then created some other characters from other games. This character is from the game called "Assassins-Creed"
 This was created using a HB and a 2B pencil and coloured pencils.

 This is the character out of "Command and Conquer 3 Red Alert 3" Named Tanya. This was used with a HB and a 4B pencil.
(Most art work exaggerated style)

I then started to create more colourful concept art and different styles for examples.
This is an image of a drawing that i did by memory of the joker. Most detail went into the face rather than the actual body.
i then followed the lines of "Batman" and drawn another one.
This was another colourful image that i wanted to see would be better in, compared to it being in black and white. This is an idea on what i wanted her to look like at the time, with some edits needed.
The next Drawing was very different compared to most designs i have created. For example the design was dark and had a bad vibe coming from the drawing with was a nice idea at the time.
This was mainly an idea to see what i could come up with to change the mood of most of my drawings. The drawing has obviously got some places where the editing has to go but it helped me get an idea what worked and what didn't.

I then start to try to make drawings more photo-realistic.
In this drawing i drew a child and drew him again with just the outlines. I then changed the odd feature on the lower image and turned him into a look a like of chucky. This gave me ideas on what i could do with original images and how i can change them for my self.
This is 4 images of the same drawing that i created. it shows from the very start of the drawing and how i progressed to the finished piece.
This was the final image of the drawing that i created. using only a HB, 2B and a 4B pencil.